
How To Understand Different Woodworking Joint Types
In the early days of woodworking, prior to the existence of many tools, man was limited in his methods for joining wood. Early joints were made by lashing pieces together. Although these joints served the intended purpose, they were not long lasting. Man had to come up with more secure methods for joining wood.
Over time wood joinery moved from lashed joints to joints that were secured by some mechanical means. Wood pegs were used early on, and still are in some folks woodworking, although this joinery is not commonly used these days. Wood pegs served their purpose, but man searched for improved forms of securing wooden joints and in doing so, came upon the ideas for using adhesives, nails, screws and a plethora of other fastening techniques.
Now glues, screws and nails are great for joining pieces of wood, but there is more to woodworking joinery than placing two pieces of wood next to each other, or on top of each other, and joining with glue, screws, or nails and using your good old hammer or a screwdriver. It is the purpose of this article to explain the most common woodworking joint types, so that the newcomer has a confidence in tackling upcoming woodworking projects.
Butt Joints

The butt joint is the most simplistic joint used in woodworking. As the name implies, pieces are butted against each other and joined mechanically or with adhesives. Although not the strongest joint in woodworking, the simple butt joint finds itself used in many designs.
Edge-to-Edge but joints are used to build large panels of wood for such pieces as table tops. This is done by edge-gluing multiple pieces of wood together to form a large panel of wood. Of course one could use plywood for the large panel, but plywood panels do not have the character of a glued-up panel of solid wood. Edge-to-edge butt joints do not have to be glued together, either. Some construction practices utilize cross pieces of wood mechanically joining the multiple pieces into a large panel.
Face-to-Face butt joints are used to glue up thicker pieces of wood, when solid pieces are not available. Multiple pieces are stacked on top of each other and joined with an adhesive, thus making pieces thick enough to serve the woodworker’s needs. Such face-to-face pieces are used in building table legs and columns.
End-to-Edge butt joints are commonly used in cabinet construction when building the cabinet face frames. The end of one piece is butted, 90 degrees, to the edge of another piece. Such joints are not strong unless affixed to a backing structure such as the cabinet sides, bottoms, shelves and such. Edge-to-edge butt joints are commonly glued together or fastened with mechanical fasteners.
Edge-to-Face butt joints are commonly used in cabinet and furniture construction. The edge of one piece is butted, 90 degrees, to the face of another piece. These joints are often found where the edge of the cabinet back is attached to the face of the end pieces flush or just recessed from the back edge of the sides. Edge-to-face butt joints are also commonly glued together or fastened with mechanical fasteners.
End-to-Face butt joints are also commonly used in cabinet and furniture construction. This joint can be found where fixed shelves are attached to the sides of the cabinet. The end of one piece is butted to the face of the other piece and is secured by adhesives, support blocks, and/or mechanical fasteners. The end-to-face butt joint is very week without utilizing fasteners or supports of some sort.
Miter Joints
Miter joints are also common woodworking joints. Door frames, window frames, picture frames, and furniture construction utilize miter joints. Although the common miter joint is comprised of two pieces of wood, each cut at 45 degrees and joined together to make a 90 degree joint, miter joints can be of any imaginable angle, all determined by the angles cut on each piece of wood.
A 6-sided piece will have 60 degree corners, which require miter cuts of 30 degrees. An 8-sided piece will have 45 degree corners, which require miter cuts of 22.5 degrees. A 12-sided piece will have 30 degree corners, which require miter cuts of 30 degrees. The combinations are almost endless.
Face-Miter joints are made by making the angled cuts across the face of the pieces. Such joints are commonly found in door frames and picture frames. Face-miter joints may be fastened with adhesives, mechanical fasteners, wood splines, or a combination of both.
Edge-Miter joints are made by cutting the edges of two boards at angles. The angle of the cuts will determine the angle of the corner joint when the two pieces are fastened together. Forty-five degree edge-miter joints are commonly used in building square columns, table legs and such.
Lap Joints
The lap joint is made my simply laying one board on top of another and fastening it with adhesives, mechanical fasteners, or a combination of both. The simple lap joint is not very attractive although it does serve its function. Such joints can be found in old home and barn door construction. Lap joints can be produced in a multitude of angles, but the 90-degree lap joint is probably the most common.
Half-Lap joints are a bit more complicated than the lap joint in that each piece of wood is reduced by half the thickness where the lap joint is to be made. This reduction in thickness can be done with hand tools or with power tools. Of course using power tools speeds up the process in making the cuts, and many times a jig can be set up to make multiple half-lap joints cut to the same dimensions. The half-lap joint is commonly used to make a 90 degree corner joint, although other angled joints are also possible.
T Half-Lap joints can also be made to any angle, similar to the half-lap joint, but unlike that joint the T half-lap joint is made in the middle of one board, not at the ends of both. The T half-lap can be found in cabinet frame construction as well as furniture construction. The T half-lap joint also allows two overlaying pieces to maintain the thickness of one piece when being joined.
Full Lap Joints are similar to Half-Lap joints and T Half-Lap joints, with the exception in that only one piece of wood has the joint cut half the thickness of the board. The second piece is left in its full thickness. Full lap joints can be found in drawer guides in some furniture projects.
Groove and Dado Joints
Groove Joints are made by cutting a groove in line with the grain of a board. The groove is cut just wider than the thickness of the board to be inserted into the groove. This joint is commonly used to install backs into shelf units and book cases.
Dado Joints are made by cutting a groove in a board, but in this case, across the grain of the board. The Dado is cut just wider than the thickness of the bard to be installed. Dado joints are commonly found where a shelf is joined to the sides of a shelf unit.
Groove and Dado joints can be joined with adhesives, mechanical fasteners, or a combination of both.
Rabbet Joints
Simple Rabbet Joints are simply Dado or Groove joints that are cut along the edge or end of a board. The cut makes a notch in the end or edge of the board. Rabbet joints can be used to edge join to board, or joining corners, and even in installing the back into a book case or shelf unit. Rabbet joints can be joined with adhesives, mechanical fasteners, or a combination of both. Rabbet joints can be cut with hand tools or power tools.
Mitered Rabbet Joints are more complicated than Simple Rabbet Joints in that the an angled cut is made so that the resulting joint shoes no end grain.
Double Rabbet Joints entail cutting matching dados or grooves on the ends, or edges, of two boards. This joint provides greater gluing surface than the simple Rabbet Joint.
Toungue-and-Groove Joints
Simple Tongue and Groove joints are made by cutting a groove down the center of the edge of one board. The “Tongue” is made on the other board by cutting Rabbets on the opposite corners of one edge of the board. The Rabbets are cut deep enough so that the resulting “tongue” is centered and just wide enough to fit slightly loose into the groove of the first board. Tongue and groove joints are used to edge join boards. These joints are most commonly glued up, although tongue and groove joints made with deep grooves and long tongues can be joined with only wooden pegs.
Blind Tongue and Groove joints are similar to the simple tongue and groove joint, with the exception that the groove is not cut end-to-end in the one board. Instead, this “blind” groove is stopped short of the end, and the matching tongue is cut then shortened to fit into the “blind” groove. The blind tongue and groove joint resembles and edge butt joint when viewed from the end. This joint can be found in cabinet and furniture construction and is usually joined with an adhesive.
Coped Tongue and Groove Joints are similar to the simple tongue and groove joint, but incorporate a decorative overlapping joint. This joint is commonly used in manufacturing built up cabinet doors, providing a decorative frame around the door panel, as well as a strong joint. Coped tongue and groove joints are commonly fastened with adhesives and many times with adhesives and small nails.
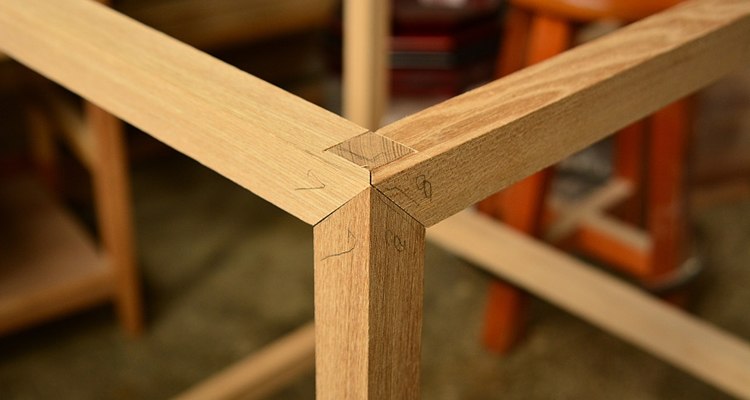
Mortise-and-Tenon Joints
Mortise-and-Tenon Joints are constructed by cutting a slot or “Mortise” in a board and a matching tab or “Tenon” in the other board. The mortise can be cut into the edge or face of the board.
Blind Mortise-and-Tenon Joints utilize a mortise that is not cut all the way through the first board. The tenon is then cut just short of the depth of the mortise. This variance allows clearance for glue when used. If not, the glue would fill the mortise and not allow the tenon to seat into the mortise.
Through Mortise-and-Tenon Joints utilize a mortise that is cut all the way through the first board. The tenon is then cut just longer than the depth of the mortise. This variance allows clearance for glue when used. If not, the glue would fill the mortise and not allow the tenon to seat into the mortise.
Dovetail Joints
Dovetail Joints get their name from the dovetail shaped notch and tab that is cut to make the joint. Dovetail joints can be made on the ends of boards, the edges of boards, or both. Multiple dove tail joints are commonly found in drawers of quality furniture. Dovetail joints can be cut with hand or power tools. Special tools are available to make multiple dovetail joints with out the woodworker having to lay out all the cuts. Dovetail joints are generally joined using adhesives.
Through Dovetail Joints are made when the groove and tab are cut all the way through the boards. This allow the dovetails to be viewed at the corners. Drawers made with overlay faces usually use through dovetails.
Blind Dovetail Joints are made when the groove and tab are not cut all the way through the boards. This allows one board to hide the joint. Blind dovetail joints are used when drawers are made without overlay face, but instead use one of the dovetailed pieces to be the drawer face.
Hopefully this information wasn’t too overwhelming and sparks your interest in woodworking. There are many more woodworking joints, but most are variations of the ones covered above. One can spend many hours researching and practicing all the woodworking joints that are out there, but these will help you get started in your woodworking adventure.
Now, it’s time to gather up the tools and start making some joints, wood shavings, and dust.