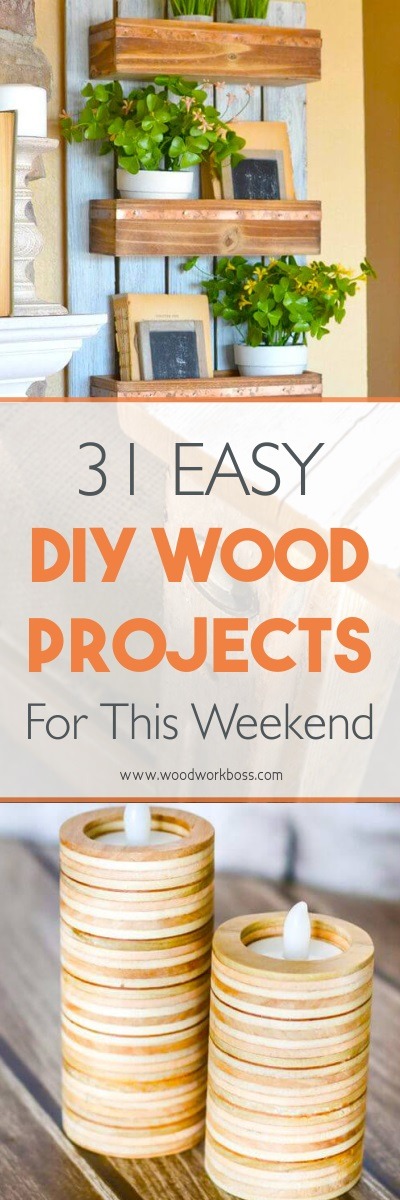
31 Dead Simple (Yet Awesome) Wood Projects
Ever felt the urge to build something with wood, but simply lack the time?
DIY and woodworking seems like a real hassle – it seems like something that takes a ton of time…
The the truth is, you can get started comfortably over a weekend. Or even just an evening.
Whether it’s your first build or your thousandth, we want to show you just how many simple projects are out there to choose from.
That’s where this article comes in…
It has TONS ideas for simple wood projects, and links to full build instructions for every single one.
If you want access to over 16,000 woodworking projects that give step by step instructions check out Tedswoodworking, the number 1 resource for woodworkers.
You’re sure to find it both inspiring and motivating, and we think you’re going to love it!
1. Elegant Wood Stool

Project credit: Craftsy
This awesome stool is not only easy to build, but also looks great!
You can probably already imagine a spot in your home where this would fit right in…
And best of all: There’s video instructions to help you every step of the way.
Click here and start building!
2. DIY Media Box

Project credit: homedit.com
Tired of having those cords all tangled and the TV area being cluttered? This tutorial shows how to build a great looking DVD media player box that fits seamlessly into your home while helping you organize the media players a bit better.
The beauty of this project lies in the simplicity. All you need are 3 pieces of wood of your choice (though we must admit natural hardwoods will look incredible), sanding block, clamps, wood glue and finishing product. The hardest step of the whole tutorial is measuring – as always, measure 9 times, cut once! You wouldn’t want to finish your project and then realize it doesn’t have enough space to fit your DVD player, would you?
After measuring simply glue the pieces together and brush with clear finish. Voila – you are now the proud owner of a new media box!
3. DIY Modern Platform Bed
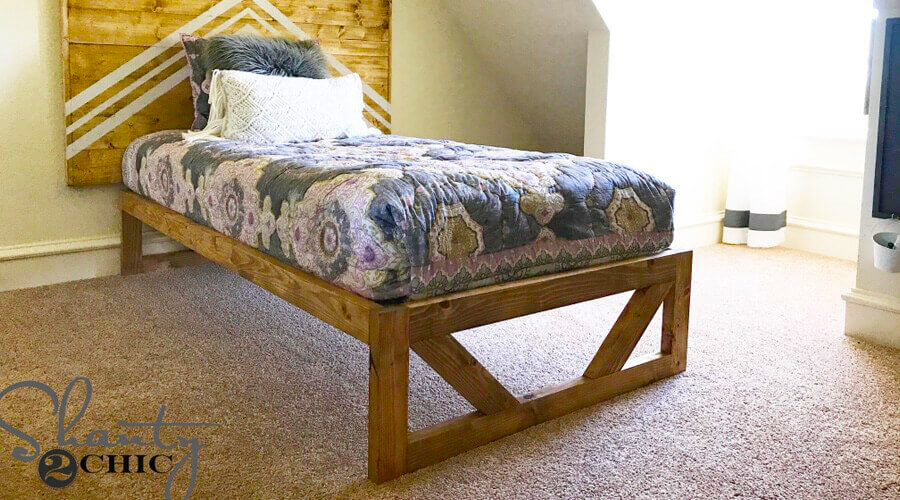
Project credit: shanty-2-chic.com
Who said building a bed should take loads of time? This step-by-step guide is not only easy to follow and a real time-saver, but it’s also budget-friendly – you can easily build this bed with just $50! And the only tools you’ll need are a drill, a Kreg Jig and a miter saw.
To get a more modern look, you can round the edges a bit as well, but that’s not necessary. The real trick is cutting and assembling the pieces, but thanks to the detailed tutorial by Shanty 2 Chic that’s not going to be a problem.
Last but not least, don’t forget to use wood stain to make the bed long-lasting and funkier. There you go – a simple modern bed built in just a few hours and without any hassle.
4. DIY Wooden Wall Planter
https://7b3054x1wcon6fwlh2-bp1-mc1.hop.clickbank.net/?tid=MYSHEDPLANS
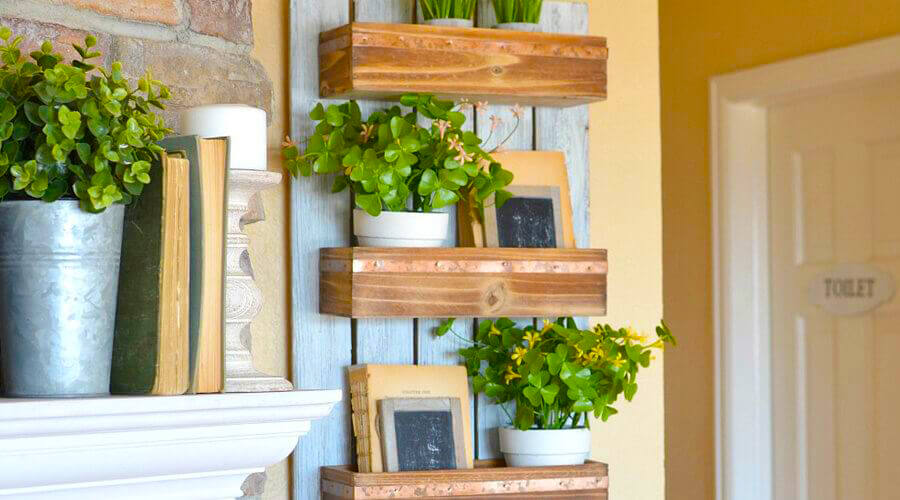
Project credit: littlevintagenest.com
A home just wouldn’t feel the same without any plants, don’t you agree? This wall planter looks delicate, cozy and is big enough for both your plants and books. A planter and a shelf at the same time – this is a must have!
The wall planter is made using pre-made wooden pallets which can save you a lot of time – just go to your local craft store to find something similar or use old wooden boxes, both will do the trick. A little paint and sanding is all these need for the perfect rustic look.

Building the whole wall planter will take just a few hours which makes this the perfect afternoon project!
5. Wooden Tablet or Cookbook Stand

Project credit: hgtv.com
If you’re a cooking enthusiast but you’re tired of getting your cookbook pages dirty during food preparation, then this minimalistic cookbook stand comes to the rescue. Not only is it fitting for a cookbook, you could also use it as a tablet stand – that way you can watch cooking videos from Youtube easily.
This is another budget-friendly plan that could be built from reclaimed wood if you happen to have some laying around in the house. Besides that, you’ll need a miter saw, clamps, orbital sander, drill and few screws.
You can also change the size and angle of the stand according to your personal taste, same goes with the finish you choose for protecting the wood. Even if you don’t have tons of experience under your belt, this tutorial is simple enough even for beginners!
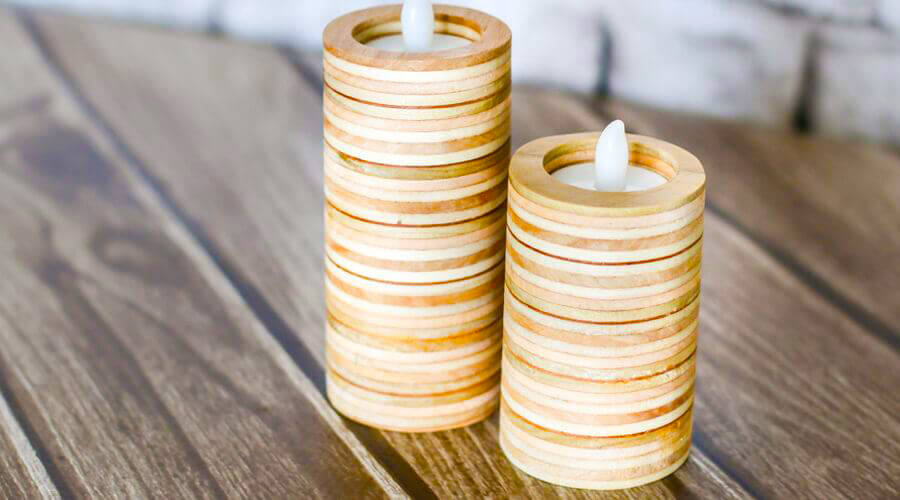
6. DIY Scrap Plywood Candle Holders
Project credit: jenwoodhouse.com
Why waste perfectly good material if you could use it for something cool like these tea light candle holders? If you’ve worked with plywood, you’ll surely have some material laying around so this is the perfect way to use all that scrap plywood.
First just cut out little circles of the plywood board using a hole saw. Glue the circles together, clamp them and wait for the glue to set. Afterwards just sand the candle holders and drill a hole where the tea light could sit in.
If you have the tools and some scrap plywood, you can give this DIY project a try this weekend. It will literally take just a few hours!
7. Reclaimed Serving Tray

Project credit: beyondthepicket-fence.com
Imagine how you could surprise your spouse in the weekend by bringing breakfast to bed on a serving tray made by you. This DIY serving tray may be the easiest project in this list, yet it’s also one of the most practical ones. However, this project comes with a twist…
This particular tray is made using reclaimed barn wood but the author of the project Beyond The Picket Fence surprised everyone with one fact: reclaimed barn wood has often some areas turned pink due to cow urine. If you check the project more closely, you’ll also notice some areas of the tray being almost bright pink. That’s something you don’t see every day!
Using reclaimed wood for food serving tray is completely safe though if you sand the surface and seal it with food safe finishing products. But the thought of having a “cow urine serving tray” is still cool (and a bit strange too).
8. Wooden Sofa Sleeve with Cup Holder

Project credit: abeautifulmess.com
If you’ve searched for easy woodworking projects, then you have definitely seen this one! This sofa sleeve tutorial is created by A Beautiful Mess and it will once and for all solve the dilemma that occurs when you want to drink a hot cup of coffee but simply don’t have any place for it while you’re reading or watching TV.
To make this handy sofa sleeve, you’ll need clamps, a hole saw, a power drill and Kreg pocket hole kit if you’d like to use it. According to A Beautiful Mess, it’s not really necessary though if the sofa sleeve is used gently. Wood glue can replace it just as well!
The tutorial has just 11 steps and the finished sofa sleeve will look simply great on your sofa. No more microwaving that coffee!
9. DIY Geometric Wood Flooring
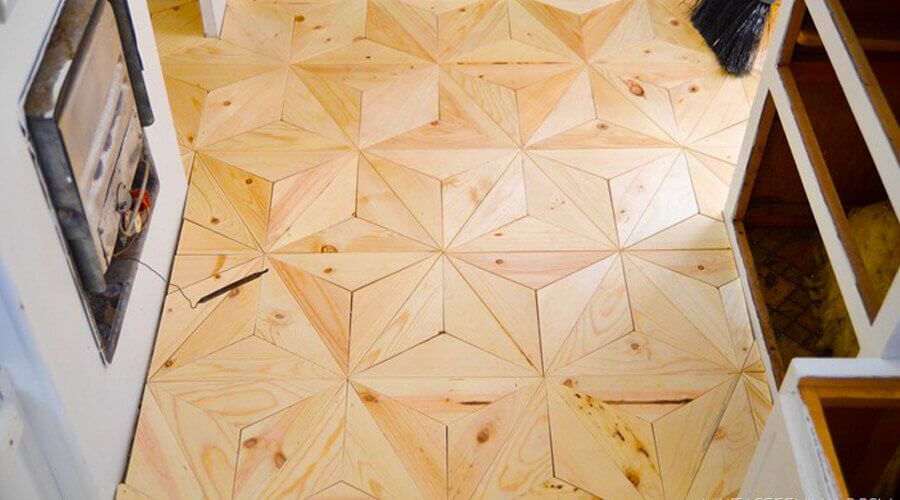
Project credit: vintagerevivals.com
You like puzzles? You love pine? And you are in a desperate need for new flooring? Well, then here’s a project that’s meant for you! This awesome flooring is made using small triangles that create a cool geometric pattern when put together.
The absolute hardest step is cutting the triangles which need to have 30 and 120 degree angles. Though cutting the triangles is not really tough, you do need to have patience and accuracy – it can be a bit repetitive. But hey, all for a mesmerizing result, isn’t that right?
If this flooring is used in the hallway, it will be a real showstopper! All that effort is worth it!
10. DIY Bath Caddy
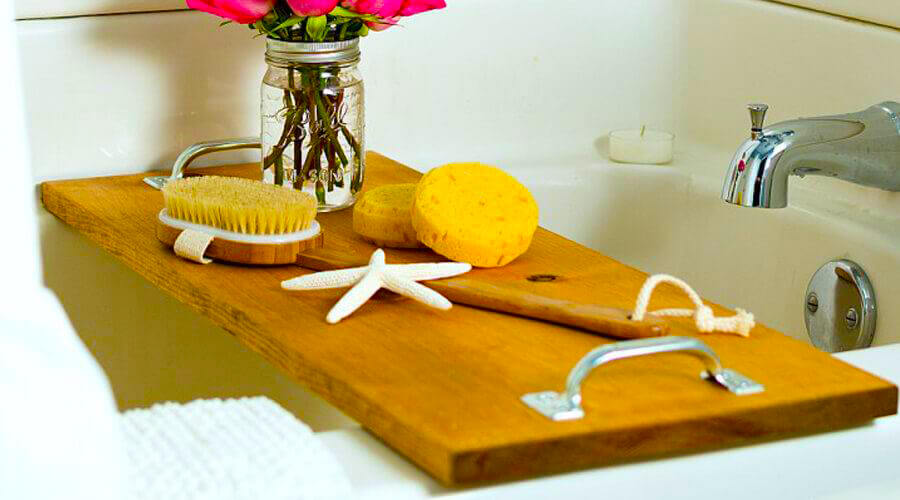
Project credit: itallstartedwithpaint.com
This nifty bath caddy tutorial is perfect for all bath lovers. You can just relax and enjoy your bath without having the fear of your phone accidentally falling in the bathwater.
You’ll just need 1 x 12 pine, some sandpaper, wood stain and hardware. Building a bath caddy literally couldn’t be easier!
If you already have some reclaimed wood, then this project will barely cost anything. Friendly on your wallet and comfy for bath time – this is a great combo!
11. DIY Bird Feeder

Project credit: 100things2do.ca
Bird houses are usually the first projects you tackle when you start with woodworking, so this DIY bird feeder project is the perfect weekend project. It’s simple and practical, but on top of that – it costs just $4 to make and takes only 20 minutes!
All you’ll need for the project is a few cedar boards, wood clue, screws and a few simple tools. Cedar is recommended for this mainly due to it’s great durability outdoors so you don’t even need finish, but for extra protection you can of course use a finish of your choice.
Once the bird feeder is ready, just fill it with seeds and use the rope to hang it on a tree branch. Those little birdies never have to stay hungry now, all thanks to your DIY skills!
12. DIY Rustic Candle Holder

Project credit: ellaclaireinspired.com
This rustic candle holder works amazingly as a centerpiece, especially during holidays. Imagine that gorgeous candle holder on the table beside Christmas decorations…
As all other projects in this list, building the candle holder is easy-peasy. Just find a cedar board that you like, then mark and drill the holes. You needn’t worry about the candles fitting the holes nicely either – as the project author Kristen has stated, the candles fit very tightly in the holes.
What makes this project even cooler is the creative freedom you have. You can align the holes whichever way you like – what matters is that you like the result and it fits your dining table!
13. Tree Swing
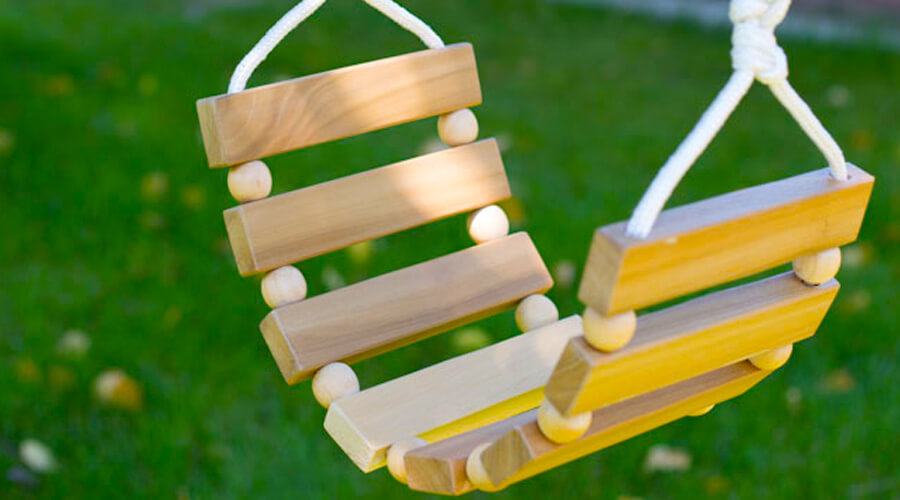
Project credit: momtastic.com
Do you remember those happy moments from your childhood when you went to the park and your mom or dad swung you? Ryan Foy introduced this great tutorial for a tree swing that fits both the kids and adults, so you could feel like a child again!
To build the swing, you’re going to need some wood planks, wooden beads, rope and a few other items that you probably have laying around the house already. Besides the project being so easy that all you need to do is drill a few holes, the finished swing looks great too!
If you follow the step-by-step tutorial and tie strong knots, this swing should nicely support up to 200 pounds. Why not build one swing for each member of your family? That way you’ll never have to hear those “swing fights” again.
14. Oversized Tic-Tac-Toe
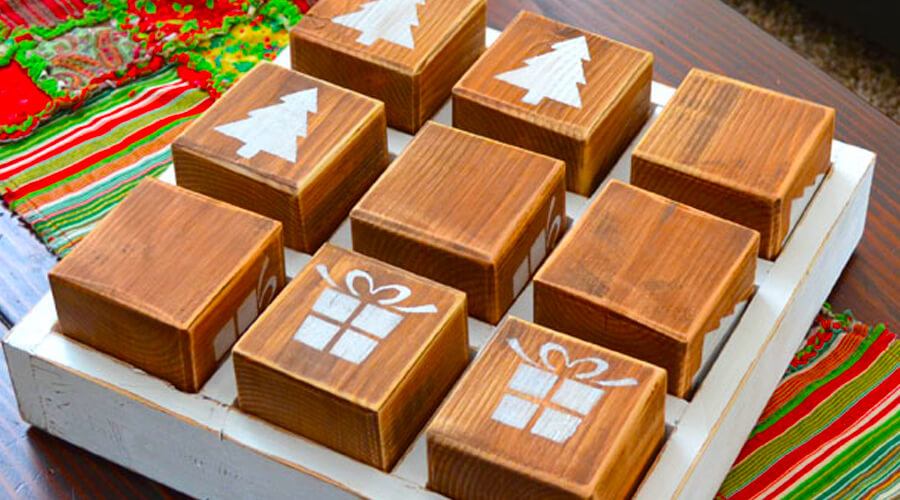
Project credit: hertoolbelt.com
We are continuing the list with another fun tutorial, this time for an oversized Tic Tac Toe game. Not only is the game fun, this is a perfect idea for a Christmas present, especially if you paint little Christmas icons on the wooden blocks (just like on the image above).
The most complicated step of this project is cutting, but thanks to Amy’s detailed instructions, cut list and images it shouldn’t be a problem. The tutorial also explains how to build the tray for the blocks.
Some wood stain, color and sanding and you’ll be good to go. If you make several sets at once, one tray of the blocks will cost you less than $10!
15. DIY Pet Bed

Project credit: prodigalpieces.com
Are you a dog lover or a cat person? Then this tutorial is exactly your cup of tea. Larissa from Prodigal Pieces built this cozy dog bed that you could easily make for your little four-legged pal as well.
The bed, including a comfy cushion, can be built with less than $30 and you’ll need just a few basic tools – like a drill, a jigsaw, a miter saw and a few other things. The tutorial also features instructions for building the custom cushion.
Though this bed is made for a rather small dog, you can actually customize the project to fit your pet – no matter how big or small your furry friend might be.
16. Wooden Pencil Holder

Project credit: cherishedbliss.com
Are you having trouble with your (or your children’s) pencils constantly getting missing or just rolling off the desk? This adorable pencil holder fixes that problem once and for all. Not only is it practical, it looks great on the desk, especially when you decorate it with something meaningful like it has been done in this particular project.
You’ll need 4×4 scrap wood (which I’m sure you have somewhere around the house already). Only tool you are going to need is a drill. It couldn’t be easier!
After drilling you can decorate the pencil holder with scrapbook paper and Mod Podge and apply a sticker on the paper, but as with any DIY project, you can feel free to decorate it according to your taste. The end result will definitely look dashing!
17. Scrap Wood Decor
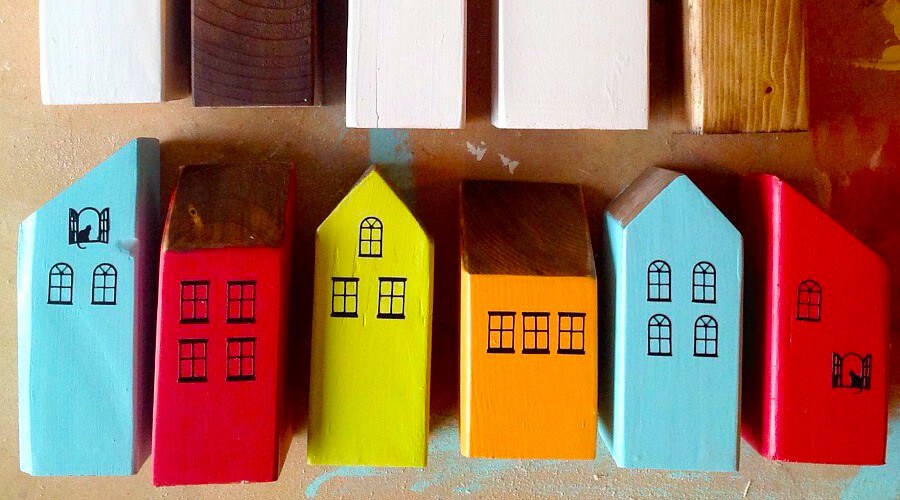
Project credit: 100things2do.ca
You just got to love scrap wood projects. After seeing this tutorial you’ll never want to throw away scrap wood again as you can just easily turn those wood bits into cute decorations. Similar wooden houses like these have been sold even in Etsy before, but you can bet these DIY decorations will cost you a lot less – they cost virtually nothing!
In this project you can just go completely wild and use all kinds of wood bits you have laying around, no matter the size or angle. In fact, the quirkier they look, the cooler!
You’ll need to sand your the bits and then paint them the way you like – you can paint them colorful as in this tutorial or get minimalistic and paint them black and white. Why not include kids as well and let them paint an entire village? That will be one afternoon well spent!
18. Wooden X-Shaped Magazine Holder
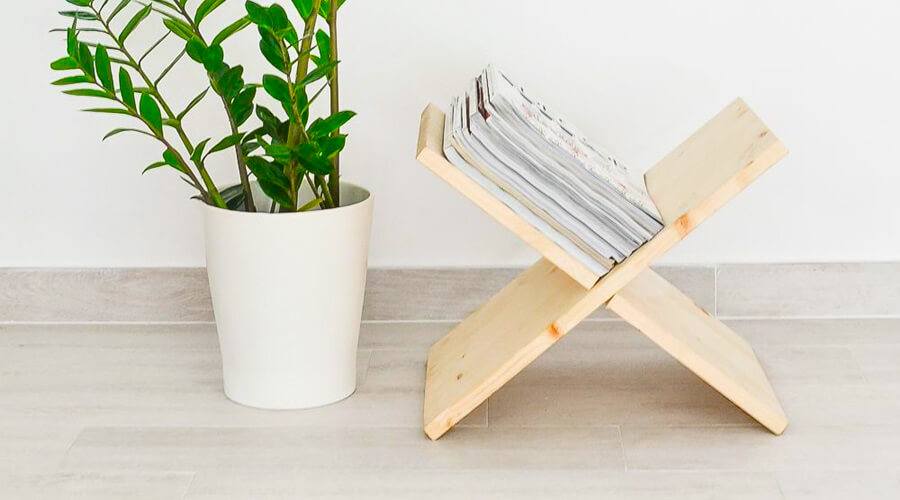
Project credit: homedit.com
Magazines have one bad habit – they tend to pile up in your home and they are usually scattered around the house. On the coffee table, next to the sofa, in the kitchen, in the bedroom – you name it and there’s probably at least one magazine there! So what to do about this mess? Build this simple magazine holder, of course!
To build the magazine holder, you’ll need 2 equal wooden planks, a ruler, pencil and a saw (a good circular saw would do the trick) – that’s it! No glue, no screws, nothing. The pieces are meant to fit nicely into each other, forming an x-shape. This also means you can disassemble it anytime, in case you don’t want to use it for some time.
What we love about this project is not only the simplicity of making it, but the minimalistic look it has. If you want to fancy it up, you can of course use some color too.
19. Rustic Picture Frame

Project credit: diynetwork.com
There’s no reason to through away old lumber – instead you can use it for this nifty project. This project features reclaimed wood, giving the perfect rustic and homey look to the picture frame.
It might not be the easiest project in this list, but if you already have some experience with wood cutting and joinery, it won’t be any hassle at all. Thanks to the extremely detailed instructions it shouldn’t really be a problem even if you’re not very familiar with woodworking. This could actually be a great project for refining your woodworking skills as a beginner!
The end result is beautiful and despite the reclaimed wood, it actually looks expensive!
20. Wooden Picture Holders

Project credit: passionshake.com
If you’re looking for a way to display your family photos, but find it tough when photos have different dimensions, then this clever project comes to the rescue. Thanks to this cool idea, you can easily showcase all photos, no matter their size – and you don’t have to worry about finding picture frames with the right dimensions.
You’ll need some wooden blocks (why not use scrap wood), glue, spray paint and some clothes pins that you can attach to the back of the wooden block. It couldn’t really be any easier!
Though the idea behind the project is so easy, these little picture holders actually look amazing and fit perfectly to a modern home.
21. Laptop Stand
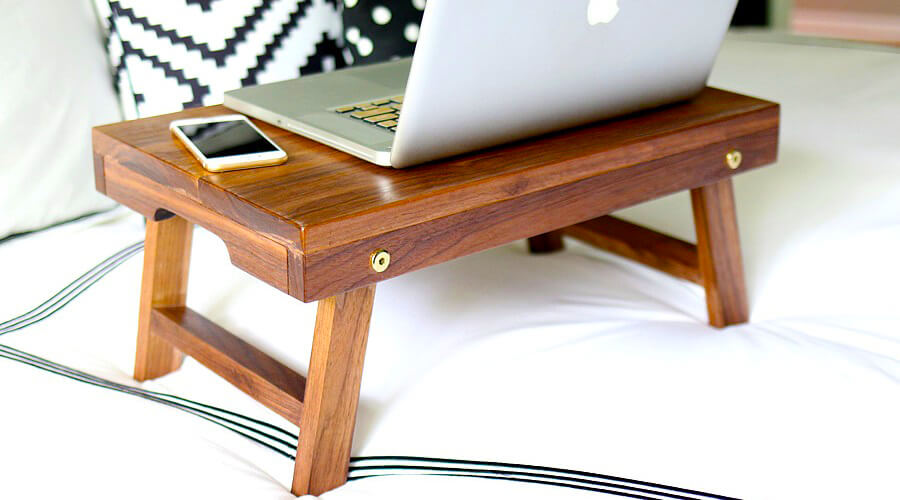
Project credit: jenwoodhouse.com
Are you constantly working in your bed with laptop? This folding lap desk is the perfect solution for modern lifestyle and makes your life tons easier! Jen from The House of Wood presented this cool idea as her contribution to the one-board challenge. The challenge was to build something out of one 1×8 board.
The project might be a little intimidating for those without tons of woodworking experience under their belt, but Jen makes the project easy for everyone, as always! So, don’t be afraid to try this out – the end result is awesome and it is definitely worth the try.
The lap desk actually has folding legs as well for saving some space. Clever, isn’t it?
22. Desk Organizer

Project credit: thekimsixfix.com
We at Woodwork Boss are all about organizing your home in clever DIY ways, so this tutorial by The Kim Six Fix instantly caught our eye. A desk organizer made from a single 1×3 board and that fits pencils, notes and a phone? Could it get any more perfect?
You’ll need a fair share of tools for this project – a miter saw, bar clamps, a power drill, a router and a random orbital sander. Other than that, the detailed tutorial makes it incredibly easy to replicate this cool desk organizer yourself!
As a final touch, you can paint the organizer with your favorite colors – just to give it a nice finished look. Now you’ll have no excuse for a messy desk!
23. DIY Wooden Clothes Rack

Project credit: chloelarkin.com
If you’re all about minimalism and you don’t want to have your clothes in a big bulky closet, you should consider building this super easy clothes rack. By ‘super easy’ we literally mean it – according to the project’s author Chloe, it only took 15 minutes to build!
The minimalistic look comes from using untreated pine and assembling the wooden pieces in a clever simple way. A bit of wood, screws, a drill and 15 minutes – this is a wonderful project for a Saturday afternoon.
This is especially handy if you’d like to hang your favorite clothes in reach, without digging through the closet every time but this could work perfectly for hanging your accessories as well!
24. DIY Wine Box
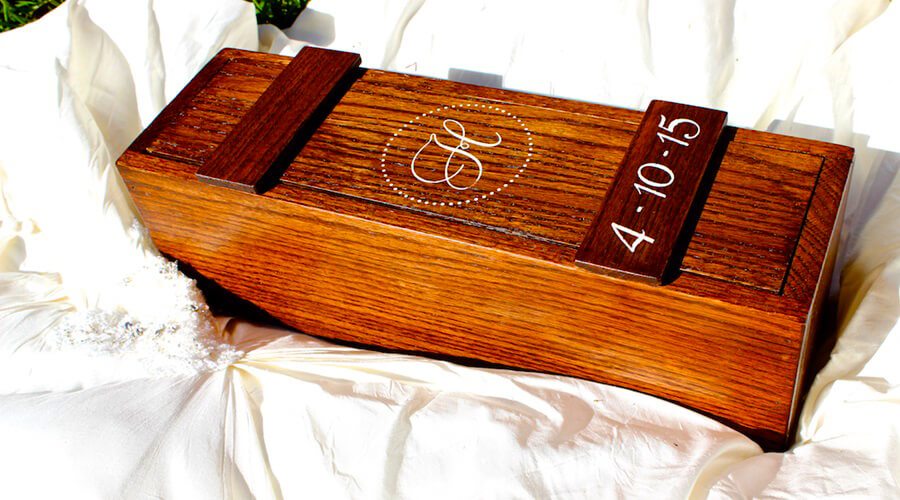
Project credit: rogueengineer.com
Are you looking for a memorable and unique wedding gift? A wedding wine box is a trendy gift, but making one yourself makes the gift simply so much personal. Better yet, it’s a budget-friendly project!
This particular wine box is built from red oak and the main tools you’ll need are a miter saw, table saw and a nailer. Luckily though, cutting the pieces is the most complicated step of the project and honestly, even that’s not too complicated.
To turn this beautiful box into a meaningful wedding gift, just paint the couple’s initials and wedding date. There you go – just one afternoon and you’ll have the most impressive wedding gift ready!
25. DIY Circle Wood Shelf

Project credit: newblooming.com
Who said shelves have to be rectangular? Give your rooms a cool modern touch with this circle wood shelf that looks so unique that you’ll definitely have friends asking where you bought it from!
This is one of the most clever DIY wood projects since it actually doesn’t require much carpentry skill at all. In fact, the circle of the shelves is made of quilting hoops! You do need clamps for this though – be ready to clamp this beauty crazily!
Thanks to the fun look of this shelf it fits perfectly for a nursery – that’s exactly what the purpose of this particular shelf was. Why not decorate your own nursery with something as cute as this?
If you’re looking for something bigger and with a more rustic style you might also like this bookshelf made from copper and wood.
26. DIY Mid Century Nightstand
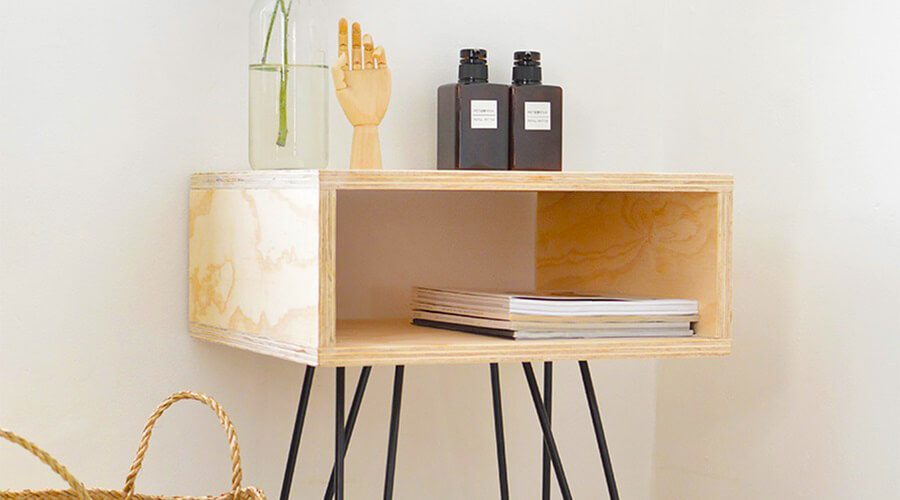
Project credit: burkatron.com
This mid century style nightstand looks like it just jumped out from the cover of a decor magazine. Simple rectangular shape and hairpin legs look simply brilliant together, especially when the wood is untreated.
As the nightstand is made out of plywood, it’s also budget-friendly! The same idea could easily be applied for making something bigger, such as a coffee table. Or you can take this even further and use some other wood, such as pine. The choices are endless!
This project simply proves once again that simplicity is the best. Practical and gorgeous – this one really is a heart-stealer!
27. DIY Modern Wine Rack

Project credit: kj.com
Here’s another project for wine lovers. With this simple wine rack, you don’t have to store your beautiful wine bottles in a cupboard. Instead, you can showcase them on your kitchen counter!
This wine rack is built to fit 6 wine bottles on it, but thanks to the simplicity of this idea, you could easily make the wine rack as big as you’d like – whether that’s 4, 6 or even 12. You’ll just need a board cut to the size you’d like and some huge framing nails.
Just drill the holes, hammer the nails through and you’re done. You can then lean the rack against a wall or even wall-mount it – whatever you prefer. This is a must-have for every wine-lovers home!
28. Wooden Triangle Shelves

Project credit: wellmadeheart.com
If you’ve ever searched for DIY shelf ideas, you’ve definitely seen triangle shelves. Not only are triangle shelves popular among DIY-ers, you can find such shelves even from furniture shops. You can bet that the price tag there is rather hefty! That’s not the case with this project though.
As always, you’ll need a few wood boards and a miter saw. Just nail them together and you’re done! You could also use wood glue if you prefer that, but in that case you need to be patient. One way or the other, you can easily make 10 or even more of these shelves within just one weekend.
Feel free to change the measurements as well and create triangles in different sizes. That way you can create a quirky wall display with photo frames and cool triangle shelves. It will look exactly like in home decor magazines, you can be sure of that!
29. Rustic X-Bench

Project credit: diyhuntress.com
You can never have too many benches. While benches are usually considered to be something more demanding when it comes to carpentry skills, this project proves that wrong. This affordable bench plan is feasible even for beginner woodworking enthusiasts.
You’ll need a few 2×4’s and one 2×2 and some tools, including a pocket-hole jig, a drill, a miter saw and few other woodworking essentials. Once you have the tools and materials, the rest is easy: cut the pieces according to the cut list, create the frames, x-s and shelves, then assemble all pieces together.
As you might have noticed from the images, it’s not only a nice sitting area, but it also functions as an extra storage space. Clever!
30. Modern Outdoor Chair

Project credit: cherishedbliss.com
Similarly to benches, you can never have too many chairs. These great DIY outdoor chairs are built using only 2×4’s and screws! Thanks to using just 2×4’s, the chairs look minimalistic and modern – perfect for your backyard.
The wood of choice here is redwood as it has natural tendency to resist to warping, shrinking and other ugly phenomenons that might happen with outdoor furniture. Other than the wood, you’ll need some regular tools such as a drill, a table saw and an orbital sander.
Though these chairs have been built for outdoor use, you could easily build them for indoors as well. Wooden chairs always make the room shine!
31. DIY Bedside Tables

Project credit: jenwoodhouse.com
Doesn’t this bedside table nightstand look simply adorable? Jen from The House of Wood is here to inspire us some more with this great idea. If you’re constantly struggling with organizing your bedroom, then this is your go-to weekend project.
Though slightly more complex than other projects in this list and you might need to use some more complex tools (like a table saw), building this doesn’t take much time at all, meaning you can easily build this within one weekend. Be sure to follow the plans nicely and you’ll do great!
The result is simply breathtaking and very impressive. We can bet if anyone sees your brand new nightstand, they’ll wonder where you bought it from – that’s simply how good it will look!
32. Cool Pallet Wood Chair
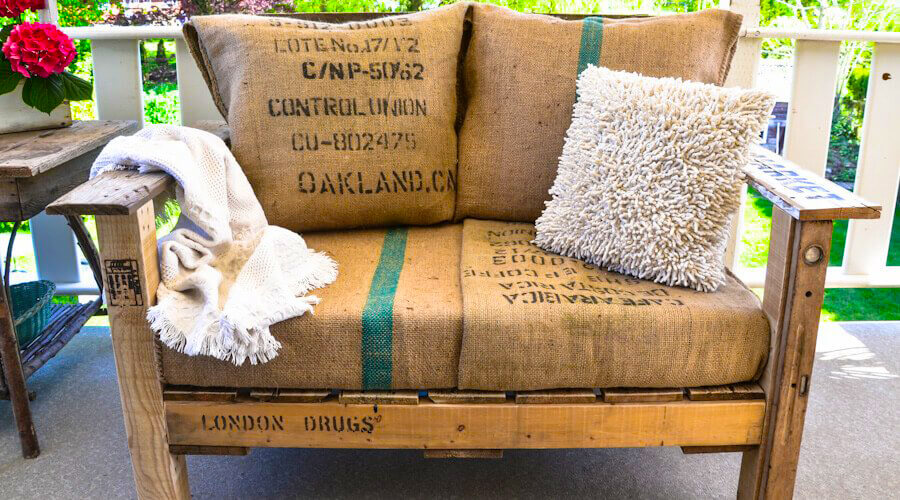
Project credit: funkyjunkinteriors.net
We all have a few old wooden pallets laying around somewhere, so why not use them for something practical like this cool chair? This tutorial by Funky Junk Interiors gives a new twist to building outdoor furniture out of pallets by combining another pallet for backing.
Contrary to most woodworking projects, you don’t have strict measurements to follow because the size of the chair will solely depend on the size of the pallets you use. That gives you complete creative freedom!
As pallets themselves are rather uncomfortable, don’t be afraid to splurge on pillows. In the end, that’s what will give true life to this project!